Table of Contents
Logging In to the Course Website
You can log in to the WordPress website by navigating to the URL emailed to you when your website account was created. View the site at https://macroeconomics.sites.grinnell.edu/. If you forget your password, you can re-set it from the log-in page by clicking the “Lost Your Password?” link.
Sites @ Grinnell keep regular back-ups (usually on a daily basis) for 30 days, so have no fear in case of any glitches or issues! We will be able to restore your content using the latest backup.
Building a Webpage
You will use WordPress’s Pages feature to build webpages. Pages are static (vs. Posts, which are blog posts that appear in chronological order and can be associated with tags and categories).
Follow these instructions for creating or editing a page:
- Click Pages in the left-hand navigation menu.
- Click Add New if you want to create a new page or click the title of an existing page to edit.
- Click the blue Edit with Elementor button to edit the page in Elementor.
- Click the plus button on the page to add a new page section and select your column layout.
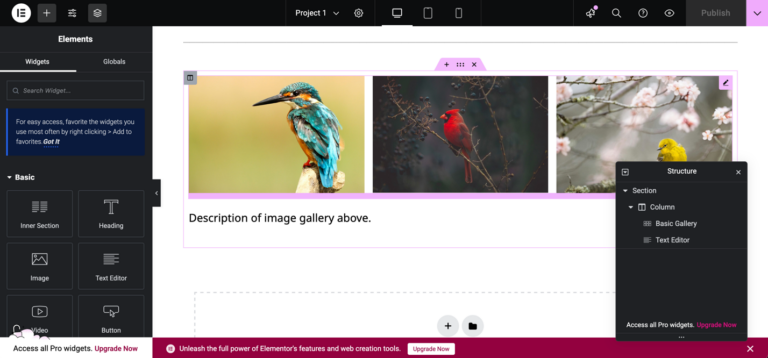
- Click the plus button in the top left (part of the side menu) to add content widgets to the page by dragging and dropping them. Some widgets of interest:
- Heading
- Table of Contents (is built automatically using your headings)
- Text Editor (for paragraphs of text)
- Image
- Image Gallery
- HTML (to embed content from elsewhere, such as a data visualization in an iframe)
- After clicking on a widget, you can customize its content and styling from the left-hand menu pane. Navigate using the tabs at the top (Content / Style / Advanced) to make your desired customization.
- When you’re done working on page content, click the Publish button in the top right to make your changes visible on the front-end, or the Save Draft option (in top right carat dropdown) to save your changes but keep the page private for now. Don’t forget to save as you go, so your work is saved if you leave and come back.
FYI: while site pages can be edited by multiple people, only one person can edit a page at one time.
Please note that you do not have to use the Elementor plugin to build pages and can instead choose to use the WordPress block editor. You can make this decision at the page level.
Adding Images
Images you upload to the website live in the site Media Library, available from the WordPress dashboard left-hand navigation menu under Media.
Here’s a walkthrough for adding images to your webpages:
- Drag and drop your desired image widget (Image, Image Carousel, Basic Gallery…) into a section and column on your page.
- From the widget’s Content tab, select your image(s) using the Choose Image button. You can choose to either upload a new image or select an existing image from the Media Library.
- Before you add your image to the page, make sure that it has alt text (alternative text, describing the image for users who use a screen reader).

Embedding Data Visualizations
You can embed interactive data visualizations from elsewhere onto your webpages, as long as they are shareable.
Click the Share button and select the option to embed the chart (see screenshot). Then copy the HTML embed code (which should start with “<iframe“).

Then, back on your WordPress webpage, drag and drop the HTML widget onto your page. Paste the embed code that you copied into the HTML widget text box. When you click away, you should see the embedded visualization appear on your page.

Accessibility
“Web accessibility is the inclusive practice of ensuring there are no barriers that prevent interaction with, or access to, websites on the World Wide Web by people with physical disabilities, situational disabilities, and socio-economic restrictions on bandwidth and speed.” (Wikipedia).
As you build out your site, keep accessibility in mind – think about:
- ensuring a logical document/page structure (nesting headings correctly H2 > H3 > H4…)
- breaking up walls of text
- use of color: appropriate color contrasts, avoiding colors that are too bright, being careful when using colors to convey meaning…)
- legible typeface and font size
- providing text alternatives to multimedia content (alt text for images, captions or transcripts for videos)
- writing links that make sense out of context (avoid “click here”)
- using an accessibility checker, like the the Editoria11y Accessibility checker plugin (already installed)
Copyright & Finding Reusable Images on the Web
Since this website is public, it’s important to look for and use images that are licensed for you to reuse freely, without worrying about copyright. Consider:
- Photographs you took or other images that you created yourself.
- A Creative Commons license is a copyright license that allows works to be used by others. Different types of Creative Commons licenses exist, with differing restrictions. For example:
- CC BY-NC-SA (attribution, non-commercial, share-alike)
- Works in the public domain are freely available and are not subject to copyright laws.
If an image is copyrighted, or you are unsure of its copyright status, do not use it on the website.
Here are some resources for finding images licensed for reuse:
- Creative Commons website
- Wikimedia Commons
- Flickr, for images (ensure “Creative Commons” is selected in your search)
- Unsplash, for high quality stock photos
Get Help When You Need It!
If you have questions, need help, get stuck, or want support trying something new, there are support resources out there for you!
- Vivero Digital Fellows trained in a variety of digital tools and approaches (including WordPress) hold peer mentoring drop-in hours in the Burling Library Digital Studio from 7-9 PM Mon-Thurs and 3-5 PM & 7-11 PM Sun.
- Tierney Steelberg, Digital Liberal Arts Specialist: email steelber@grinnell.edu
- Mo Pelzel, Director of Academic Technology: email pelzelmo@grinnell.edu